Deliver to NGA
IFor best experience Get the App


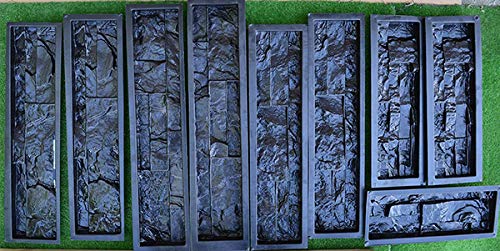
SvitMolds Concrete Molds DIY Set 9 Plastic Molds for Concrete Plaster Wall Stone Cement Tiles Mould ABS Natural Stones for Walls W02
Details
- BrandSvitMolds
- MaterialABS plastic
- ColorGray
- Finish TypeTextured
- StyleModern
- Installation TypeGlue Down


Description
🛠️ Unleash Your Inner Designer with SvitMolds!
- MODERN AESTHETIC - Geometric patterns that elevate any decor style.
- ECO FRIENDLY DESIGN - Crafted from durable, reusable ABS plastic.
- USER FRIENDLY SETUP - Glue down installation for a seamless finish.
- TRANSFORM YOUR SPACE - Create stunning natural stone walls effortlessly!
- VERSATILE APPLICATIONS - Perfect for both indoor and outdoor projects.
The SvitMolds Concrete Molds DIY Set includes 9 high-quality ABS plastic molds designed to replicate natural stone textures. Covering an area of 0.52 m², these reusable molds feature 5 distinct textures, making them perfect for both indoor and outdoor applications. With a modern geometric style and easy glue-down installation, they are ideal for DIY enthusiasts looking to enhance their spaces.


Specifications
| Brand | SvitMolds |
| Material | ABS plastic |
| Color | Gray |
| Finish Type | Textured |
| Style | Modern |
| Installation Type | Glue Down |
| Product Dimensions | 24.41"L x 7.09"W |
| Pattern | Geometric |
| Item Weight | 1 Kilograms |
| Shape | Rectangular |
| Item Thickness | 2 Millimeters |
| Edge Style | Square Edge |
| Recommended Uses For Product | Outdoor |
| Coverage | 0.52 square feet |
| Form Factor | Set of interchangeable molds |
| Water Resistance Level | Water Resistant |
| Special Feature | Reusable molds with 5 different textures |
| Global Trade Identification Number | 07433000302318 |
| Manufacturer | SvitMolds |
| Part Number | 4336446301 |
| Item Weight | 2.2 pounds |
| Country of Origin | Ukraine |
| Item model number | #W02 |
| Is Discontinued By Manufacturer | No |
| Finish | Textured |
| Item Package Quantity | 1 |
| Number Of Pieces | 10 |
| Special Features | Reusable molds with 5 different textures |
| Batteries Included? | No |
| Batteries Required? | No |
Have a Question? See What Others Asked
Reviews
A**
A definite buy but read reviews before making them, it helps
I LOVE THIS MOLD!!! I have read most of the results before and after purchasing. So to the point.Patience!!- don’t believe too quick to remove from mold. The cement used is most impossible as they tend to break a lot. It was after my 4th set that I got results. Issues were below;1. Was only using sand and cement and was mixing ratio 3sand:1cement( this was TOO WEAK) - when I use more cement it dries faster.2. I did not give it enough time to dry. takes about 12-16 hours to safely remove castings from molds.Another issue was that some of the molds are warped, hogging( middle section pushing up). I solved the issue by resting them on chocks at each end so the weight of the concrete presses down the middle by gravity. This works well!!Also, I used a vibrating table. When they break, if you look closely at the inside lattice( surface) you will see a lot of air pockets. So the vibrating table eliminated that.I find that cooking oil is a bit too thin and leaves a lot of bubbles even with the vibrating table. A thicker substitute worked for me( 20W40) motor oil.For a clean professional finish, when I LIGHTLY oiled the molds, right before I pour the concrete, I lightly pour powdered cement to coat the surface, as you would do when baking with flour in the baking trays. I find the finish is VERY smooth and even if bubbles were there before, this would eliminate them.ENSURE the concrete is mixed thoroughly, using sand, fine gravel and cement. My mixture 3sand:2gravel:2cement. This is so because I don’t have “fast setting concrete”( Quickcrete). I researched the components and tested my method. I used ordinary cement.DO NOT FORCE THE MOLDS OFF. If when you are removing them and they are tight, gently pour warm water over the mold and they will come off easily, but try not to do this as much it may eventually warp the molds.I colored the concrete mixture but find staining them works for me. It’s a very patient hobby. You will get the hang of it after a couple tries, just don’t give up!!.Great stuff and good luck!!
M**H
Just do it. The experience is something you cant put a price on.
This is a very time consuming but money saving way to get the custom look you want. I only bought the 9 pce set. In hind sight i should have bought the full package. Out of the 9 there was one no matter what i did it would break. But really its no big deal. Run the broke edges throigh your tile saw n now you just have two smaller pcs. Lol. Anyway to get the 200sq ft I needed in Washington starting in March with cold nights i could only get one mix in 24 hrs. Once June came round i had a system and with warmer days n using the red bag quick dry cement i was getting 2 mixes in 24 hrs.My best results.1. Every use....... Clean thoroughly (dry wipe)2. Murphy's oil in a spray bottle then use a paint brush to coat EVERY part including tight corners and sides of mold. No puddles. Dont worry if it discolors your mix. It washes off.3 red bag qick set concret. 1 bag plus 2qts portland cement 2qts sand 1 qt pea gravel. It fills all nine every time with nothin but a handful or so to toss.4. IMPORTANT. You need a makeshift vibration system to get out air bubbles. I attched my bench grinder cause it shakes a lot to a board under shelf across a couple saw horses. Ran for about 10 minutes.This is where practice never makes perfect but you will get better at it. Removal. Dont twist. Dont pry from middle. Gently lay on face flat ...tap the corners. Lift. Slowly at a coerner or end pulling on lip. Carefully while softly pushing on the corner bottom. Then work other end. When you feel it move try n lift the entire mold straight up with a mild. Side to side rocking motion. They break. They break they break. Get used to it. Some molds never but 50% success is good.Like is said none of it goes to waste reall. Cut the broken edges off with your tile saw. Good to go.4 1/2 months to make 200sq ft. Cost less than. $650 total. Find 200 sq ft of stacking stone anywhere for less than 3x that n you got a steal.Use acid stain. Idc about what any one tries to tell you. Use acid stain. Pick from 50 labels n 100s of colors. I did 2 coats stain n one coat clear gloss sealer. Added 30k to the street value of my house for under $1000.Just a lot of time.
K**D
Great product
This product is sturdy and will stand the test of time if cared for properly. The end product looks amazing. The large molds are somewhat thin in the middle creating broken tiles. To solve this issue I used two layers of hardware cloth cut just slightly smaller in length and width. Pour half way up with your concrete add hardware cloth and finish filling the mold. Always tip your tile on its side lengthwise before picking it up (while still curing) and you won't accidentally break a tile in half. I'm using canola oil as the release agent brushed on with a paint brush. Its a chore to make only 9 per day, I'll likely buy another set. I highly recommend this product.
A**R
Great tool
We used this to create stone for our siding and it worked great! We played around with sprays like WD-40, pan spray and cleaner spray to see which one helped the concrete not stick to it. We liked the DW-40 the best.
I**N
Do not order
Use caution when ordering, make yourself a favor and avoid headaches- spend extra money on the rubber molds. I ordered these plastic molds, I used 6 versions of cement mix, ALL BROKE. I casted 200 pieces I had to used proken parts one by one.
E**O
Very hard to get the end product out, but they seem very strong
This is a great mold set so you can make your own stone bricks. The only reason I gave it a four is because its extremely hard to get it out once the cement cures. Even if you use oil or wax. I think Im going to have to open two of the mold corners to easily remove the it. I wish the were make with scillocone rubber, not plastic. Other than that, I expect these molds to last a long time but only time and use will tell
K**R
You will need to know how to Die the concrete to make it look like the pic. Don't be fooled yours will not look like the pic!
I have made a few and seem to work fine. If you want to save some money and diy a wall this would be the way to go. If you want to make some to sell I would go with the rubber molds.
Common Questions
Trustpilot
3 weeks ago
2 months ago
Get the App
